Starting Claude in a tab
Right-click any tab → "Start Claude here…" opens a launch dialog.
Options
- Permissions — Claude Code's real permission modes: manual (default — every action asks) · auto mode (runs without routine prompts; a safety classifier reviews each action — needs an eligible account/model) · accept edits (file edits and common filesystem commands run, other commands still ask) · plan mode (read-only planning) · don't ask (auto-DENY anything not pre-approved) · bypass everything (--dangerously-skip-permissions — dangerous).
- Session — start new · continue last in this folder (--continue) · pick from past sessions (--resume opens Claude Code's own session picker right in the terminal).
- Name it — optional session name (-n), so you can resume it later by name.
- Worktree — optional isolated git worktree (--worktree), Claude works on its own branch — the recipe for parallel agents in parallel tabs.
- Connect PounceTERM MCP — registers PounceTERM's tools first, so the new Claude can drive the app. For an SSH tab this points at the reverse tunnel automatically.
- Connect the chat panel — makes this Claude the backend for the sidebar chat (see "The chat panel").
- Profile — which Claude identity to use (see "Claude profiles"). Local tabs only.
- Model — default / opus / sonnet / haiku.
- Extra flags — advanced free-form flags appended to the command (e.g. --resume or --verbose).
Permissions, Session, Model and Profile are colour-coded pickers rather than plain dropdowns: on Permissions the colour is RISK (green asks first or only reads, amber acts on its own, red skips every check), and on Session, Model and Profile it is IDENTITY — a stable colour you learn to recognise.
The panel remembers how you last launched Claude: permissions, session mode, model, the connect toggles, extra flags and profile all come back next time. Name it and Worktree deliberately do NOT persist — reusing a session name collides, and silently reusing a worktree would put Claude on the wrong branch. A live preview shows the exact command before you launch, with a Copy button. For an SSH tab the command runs on the remote host (that's where the shell is). Once Claude is detected, the tab badges with a sparkle and the status bar shows "Claude".
claudestartlaunchmcpbypasspermissions
Claude profiles: separate accounts and orgs
If you use Claude Code with more than one identity — a work account with several organizations, plus a personal account — profiles let you pick which one a tab uses when you start Claude.
How it works
Each profile is an isolated Claude configuration directory (CLAUDE_CONFIG_DIR) under ~/.claude-profiles. A profile keeps its OWN login, org choice, history, and settings — completely separate from your regular ~/.claude. PounceTERM never touches credentials or the keychain; it only points Claude at the profile's folder.
Because profiles are isolated, different tabs can run different identities AT THE SAME TIME — work-Claude in one tab, personal-Claude in another.
Setup
1. Settings → Claude Profiles → "+ New Profile", give it a name (e.g. personal).
2. Right-click a tab → "Start Claude here…" → pick the profile in the Profile dropdown.
3. First start only: Claude asks you to log in right there in the terminal — sign in and pick the org for THAT profile. Done once, remembered forever.
Profiles created by other tools that use ~/.claude-profiles (for example claude-switch's isolated mode) appear in the list automatically.
Same email, multiple organizations
One account can belong to any number of orgs — say a personal plan plus one or more Enterprise orgs, all on the same email. Make one profile per org and sign in with the SAME email in each: Claude's login asks "Select organization", and that pick is what the profile remembers. From then on each profile always opens in its org, and any of them can run side by side in different tabs. To switch orgs, start Claude with the other profile — don't run /login inside a session, which would re-bind that profile to whatever you pick.
Example setups
- WORK + PERSONAL, ONE EMAIL: profiles "work-enterprise" and "work-personal", both signed in as you@university.edu — one picks the Enterprise org at login, the other your personal plan. Enterprise Claude reviews the work repo in one tab while personal Claude runs a side project in another.
- CONSULTANT WITH CLIENT ORGS: one profile per client ("client-acme", "client-globex"). Each keeps its own org, history, and MCP registrations — nothing from one client's work ever shows up in another's /resume list.
- A SCRATCH IDENTITY: profile "scratch" for experiments — try risky settings, hooks, or MCP servers there; your main ~/.claude config and history stay pristine. When it gets messy, Remove it, delete the folder in Finder, and make a fresh one.
- SHARED DEMO MACHINE: a "demo" profile holds a login that isn't yours, so screen-shares and recordings never show your account, orgs, or history.
Good to know
- "Default" is your regular ~/.claude login and is always available.
- The dropdown remembers your last-used profile, and restarting Claude in a tab preselects the profile that tab last ran.
- Rename changes only the display name (the folder and its login never move), and "Show in Finder" opens the profile's folder.
- Every profile has a colour. A new one takes the first unused colour from a palette of eight; click the swatch in Settings → Claude Profiles to change it. The colour follows the profile everywhere it is named — the Start Claude picker, this list, and the status bar — so you can tell identities apart at a glance.
- Right-click a tab while Claude runs to see which profile it's using — checked against the live process, so it's right even if you restarted claude by hand.
- Removing a profile only removes it from the list — the folder (and its login) stays on disk, so re-adding the same name brings it straight back.
- Profiles are folders on this Mac, so the dropdown applies to local tabs; an SSH tab's Claude uses the remote host's own login.
claudeprofileaccountorgloginswitchworkpersonal
AI control: what turning it on does
AI control is the line between "Claude can suggest" and "Claude can act".
When OFF (the default)
- Claude can READ the terminal screen and scrollback.
- Claude can TYPE a command into the input line (send_text) — but it does NOT press Enter. The command waits for you.
- Claude CANNOT execute anything. run_command is refused.
When ON (you flip it per tab)
- All of the above, PLUS Claude can run commands itself — run_command sends the command and presses Enter.
How to change it
Right-click a tab → "Allow AI control" / "Revoke AI control". The tab icon becomes a robot and the status bar shows it while on.
Safety
- It is per-session and defaults OFF.
- A host marked "Never allow AI execution" refuses the toggle entirely (use it for prod).
- AI control is a USER-ONLY control — it is never an MCP tool, so Claude can never grant itself execution.
Leave it off for anything sensitive; turn it on for a scratch box or a repetitive task you want Claude to drive.
aiclauderunpermissionssafetyrobot
The chat panel (Claude in the sidebar)
The chat panel (⇧⌘J) is powered by a Claude Code session you start in a terminal — not a separate LLM. It answers in the panel and acts on the terminal you're focused on.
Start it
Right-click a tab → "Start Claude here…" → check "Connect the chat panel". That Claude becomes the chat's backend (tab named "claude-chat", coral asterisk). It starts on its own — no prompt to dismiss — and uses Claude Code's channel feature to receive your messages as a push, so an idle chat costs no tokens.
Just ask
Ask in plain language about the terminal you're looking at — "what's in this folder?", "is my repo clean?", "which file here is biggest?". The chat sees a snapshot of that terminal (frozen the moment you hit send, so opening other tabs first doesn't confuse it), picks and runs the right command, reads the output, and answers — chaining several commands for a bigger question. You don't name the terminal; it uses the one you're focused on, addressed by a stable id so a rename never breaks it.
Running commands
Reading and answering are always on. Running a command needs that terminal's AI-control toggle ON (see "AI control"); otherwise the chat asks first (Allow / Deny card). Which tools run without a prompt is configurable in Settings → MCP Server → Chat → Tool permissions.
Rendering
Replies render Markdown and Mermaid diagrams.
Requires Claude Code with channels enabled (research preview).
chatclaudeclaude-chatchannelasksidebarmarkdownmermaid
Preview tab: a browser for Markdown
Claude writes plans, specs, and reviews as Markdown. The Preview tab renders them — Markdown, tables, code, and Mermaid diagrams — right beside the terminal that produced them. It is READ-ONLY by design: PounceTERM views, PouncePad edits.
Three ways in (no file browser needed)
- CMD-CLICK A PATH in any terminal — Claude prints "Wrote docs/plan.md", you hold ⌘ and click it. Paths are checked against the disk first, so only things that really exist underline. ⌘-click opens text we can render here; a folder or a binary goes to Finder instead. Right-click the same link for the full menu (see "Copying from a remote program & clickable links").
- CLAUDE OPENS IT — the preview_file MCP tool lets Claude pop the rendered plan up when it finishes writing (it's on the chat's safe list; read-only).
- ⌘O — the classic file dialog, for everything else.
In the tab
- Rendered ⇄ Source toggle — rendered by default; Source shows the raw text for copy/paste, like view-source in a browser.
- LIVE RELOAD — the tab watches the file and re-renders whenever it changes (the dot pulses). That means ANY editor closes the loop: click "Open in PouncePad", edit, save, and the preview updates itself — same for vim in the tab next door, or Claude appending to the file while you read it.
- Open in PouncePad — the one edit path. Nothing in the Preview tab can modify a file.
- Plain-text files open straight to Source view. Files over 2 MB show the first 2 MB with a note. Images and media belong to the SFTP viewer.
Why read-only
It keeps the family honest: one app per job. The moment you need to change the file, PouncePad (or vim in the tab next door) is one click away.
previewmarkdownmermaidplanviewerread-onlypouncepad
Session Stats: what a tab is up to
Right-click any tab → "Session Stats…" for a fresh snapshot of that terminal — refreshed every time you open it (or press Refresh).
Overview
How long the tab has been open, terminal size, total output and typed bytes, and — for local tabs — the live process tree: process count, memory, CPU, and the heaviest processes running under that shell.
Activity
A minute-by-minute chart of terminal output over the last hour, plus an hour-of-day strip showing when this tab has been busiest since it opened. Hover any bar or cell for exact numbers.
Claude
Whether Claude is running here and as WHICH profile (read from the live process, not guesswork), how long it's been active, and its memory use — plus the profile's own footprint: how many Claude Code sessions and projects live in that profile, disk used by transcripts, total startups, and when it was last used.
statssessionactivitymemorycpuusagecharts
Claude-to-Claude relay
Two Claude Code sessions — local or remote, in any two tabs — can talk to each other through PounceTERM while you watch.
Each Claude addresses the other by its TAB TITLE using the relay_send and relay_read MCP tools. Every relayed message is logged so you can moderate the exchange. Delivery is structured (no screen-scraping) and transport-agnostic: a session is a session whether it's a local shell or SSH.
relayclaudetwosessionsmcp
Notifications: get pinged when you're away
PounceTERM calls you back when something in a tab you're not looking at needs you — switch away and get pinged.
When it fires
- A Claude session in a background tab NEEDS YOU — an approval prompt or a question. This is detected through Claude Code's own notification hook, not guesswork, so it's the moment Claude is actually blocked on you. You get a banner.
- A Claude session finishes (goes idle, waiting for you).
- A command in a background tab runs and then settles (its output stops).
The blue dot on a tab marks any output waiting there, regardless of a notification. Notifications only fire for a tab that isn't on screen, and at most once until you look at that tab again — so a chatty log tail won't spam you. You get a macOS notification with a sound.
Mute a noisy terminal
Right-click a tab → mute it to silence its notifications while keeping everyone else's. The blue dot still marks its output; you just won't be pinged.
Turn it all off
Settings → Preferences → Notifications is the global toggle. It's on by default (a Claude-forward terminal should tell you when Claude needs you).
notifynotificationalertpingsoundclaudedonefinishedbackgroundmuteapprovalbannerblue dot
How remote Claude reaches PounceTERM (the SSH tunnel)
PounceTERM's MCP server listens only on your Mac's loopback (127.0.0.1:7460). A Claude running on a remote SSH host can't reach that directly.
The fix
When you open an SSH session, PounceTERM also opens an SSH reverse port-forward (like ssh -R): the remote host gets its own 127.0.0.1:7460 that tunnels back to your Mac. So on the remote box, http://127.0.0.1:7460/sse reaches PounceTERM.
This is on by default for every SSH host. It binds the REMOTE host's loopback — unreachable from the network, but on a shared/multi-user host other logged-in users could reach that loopback. For that case you can require an MCP bearer TOKEN (Settings → MCP Server): it's OPT-IN (off by default, since on a trusted machine the loopback bind is already the boundary), and when on, the remote Claude receives the token automatically via "Start Claude here". A host can also opt out of the tunnel entirely in its edit form ("Don't reverse-forward the MCP") — needed only if the host's sshd forbids remote forwards, or you don't want the tunnel.
Verify it
On the remote shell:
curl -s -m 2 -D - -o /dev/null http://127.0.0.1:7460/sse
A 200 with Content-Type: text/event-stream means the tunnel is live.
sshmcptunnelreverseforwardremoteenigma
Connecting to Tailscale (and Tailscale SSH)
Tailscale just provides the NETWORK ROUTE to a machine — SSH on top is normal SSH. Add the host like any other, using either its Tailscale IP (100.x.y.z) or its MagicDNS name (e.g. my-box.tailXXXX.ts.net). PounceTERM resolves and connects the same way your terminal does.
Auth is unchanged
Pick the host's auth as usual: ssh-agent, a private key file, or password. Tailscale doesn't change this — unless the host runs **Tailscale SSH**.
Tailscale SSH ("check" mode)
Some hosts run Tailscale SSH (the SSH banner reads "SSH-2.0-Tailscale"). These authenticate by your tailnet identity, and may require a one-time BROWSER check. When PounceTERM sees the login URL, it pops a dialog — click "Open login page", approve in your browser, and the connection completes on its own. The handshake window extends to a few minutes so you have time.
"dial tcp: i/o timeout"
That means the host didn't answer — it's usually OFFLINE (powered off or not on the tailnet), NOT a PounceTERM problem. Check "tailscale status": the peer must show as online. First connections to a sleeping peer can also be slow while Tailscale wakes the link.
tailscalesshvpnmagicdnsts.nettimeoutbrowsercheck
Hosts, identities, and importing from ~/.ssh
Hosts
A host is a saved SSH destination — address, user, and how to authenticate (ssh-agent, private key file, or password). Give it a color to tint its tab, tags, and an OS hint.
Identities (Keychain)
An identity is a reusable user + credential. Point many hosts at one identity — rotate the key once and every host follows.
Import from ~/.ssh
Keychain → "Import from ~/.ssh" scans your keys and ~/.ssh/config. Login keys are pre-checked; git-only keys (for pushing code) are offered but unchecked. Set the login user per key and import.
Security
Secrets are AES-256-GCM encrypted on disk (the key lives in your macOS Keychain), shown only as ***set***, and never sent to the frontend or MCP in clear.
hostidentitykeychainsshkeyimportagentpassword
Host key trust (TOFU) and Known Hosts
The first time you connect to a host, PounceTERM shows its key fingerprint and asks you to trust it (trust-on-first-use). Accepted keys are saved in Known Hosts.
If a host's key ever changes, the connection is refused until you review it — that's the protection against someone impersonating your server. Manage saved keys under Settings → Known Hosts.
hostkeyfingerprinttofutrustknownsecurity
SFTP: browse and transfer files
PounceTERM has a built-in dual-pane SFTP browser — move files to and from any host without leaving the app.
Open it
- From the + screen: each host has an SFTP (folder) button next to Connect.
- From an open SSH terminal: right-click the tab → "Open SFTP here" — it reuses that connection (no second login) and opens in the terminal's current directory.
An SFTP tab is its own tab (folder icon, host color). You can open several — even to one host — and they share the SSH connection.
Browse
Local files on the left, remote on the right. Double-click a folder to enter it; use the Up, Home, and Refresh buttons in the header. Columns show size and modified date.
Transfer
- Drag files between the panes (either direction). Whole folders transfer recursively.
- Or select rows and use Upload / Download in the pane headers.
- Drop files from Finder onto the tab to upload them to the current remote folder.
A progress queue shows each transfer (with cancel), and a transfer indicator appears in the title bar so you can keep working in other tabs while it runs. Overwrites ask first.
Remote file operations
In the remote pane: the New Folder button makes a folder; right-click a file or folder for Rename and Delete (deletes ask to confirm).
Under the hood
SFTP rides your existing SSH connection and the same saved credentials — nothing extra to set up. If the connection drops, the pane shows a Reconnect button.
sftpfilestransferuploaddownloadfolderbrowserdragdrop
Copying from a remote program & clickable links
Copy from a remote program (OSC 52)
When something running on a remote host copies to the clipboard — a Claude Code login URL, a tmux or vim yank — it lands straight in your Mac clipboard. Works over plain SSH with zero setup.
Through tmux it works when tmux's set-clipboard is on or external (the default). If a copy inside tmux doesn't reach your Mac, add to the remote ~/.tmux.conf:
set -g set-clipboard on
For safety, a remote host can never READ your Mac clipboard — it can only write to it.
Clickable URLs
⌘-click any URL in the terminal to open it in your browser. So a Claude auth URL opens in Safari without copying at all — even through tmux.
Clickable file paths
Any path in terminal output is a link once PounceTERM has checked it exists — files, folders, extensionless things like Makefile or scripts/build, dotfiles like ~/.zshrc. Relative paths resolve against that tab's folder. Prose that merely looks like a path never underlines.
- ⌘-CLICK does the obvious thing: Markdown and other text open in the Preview tab, everything else — folders, binaries, images — opens in Finder.
- RIGHT-CLICK THE LINK for the rest: Preview here, Open with default app, Reveal in Finder, Edit in PouncePad, Copy path. Options that make no sense are left out, so a folder offers Open in Finder and Copy path.
Local copy/paste
Selecting text copies it to the clipboard automatically (copy-on-select) — so a drag-selection always lands whole, no extra step. Right-click away from a link also copies the selection (or pastes when there's none), and it takes the WHOLE selection — no more losing a careful drag to the word under the cursor. ⌘C / ⌘V work too. Turn copy-on-select off in Settings → Preferences.
copyclipboardosc52osc 52urllinkpastelogintmuxyank
Bring your own AI (OpenAI / Claude / Gemini / Ollama)
Besides the built-in chat (which rides a connected Claude Code session), PounceTERM can talk to an AI provider directly using your own API key.
Configure it
Settings → AI Provider. Pick a provider — OpenAI, Anthropic (Claude), Google (Gemini), Ollama, a custom endpoint, or an API gateway — and set its model, endpoint, and API key. Each provider keeps its own model, endpoint, and key. Test Connection verifies it before you save. Keys are encrypted at rest (AES-256-GCM, key in your macOS Keychain — the same vault as your hosts) and shown only as a "saved" marker afterward, never in the clear.
Use it
Once a provider is configured, the sidebar chat (⇧⌘J) runs on it, streaming replies as they arrive. It has the same terminal tools as the Claude Code chat: it reads the terminal you're focused on, can list and switch sessions, and can run commands only where you've turned on AI-control for that tab (it can never grant itself execution). With no provider configured, the chat falls back to a connected Claude Code session.
Switch on the fly
The chat header shows the active provider and model — click it to switch to another configured provider or a different model mid-conversation, without restarting the chat. The chat also remembers context across turns, so it keeps the thread when you switch.
Import from a sibling
The AI Provider screen can import your providers and keys from PounceSQL or PouncePad — set your keys up once and use them everywhere. See "Import AI settings from a sibling".
aiprovideropenaianthropicclaudegooglegeminiollamachatapi keymodelgatewaybyo
Import AI settings from a sibling
Set up your AI keys once in any Pounce app, then bring them into the others — the family shares one AI setup instead of you re-entering keys three times.
Do it
Settings → AI Provider. Two pills — "Import from PounceSQL" and "Import from PouncePad" — copy that app's configured providers and keys into PounceTERM. Import into whichever app you like; direction doesn't matter, so set your keys up wherever's easiest.
Your keys stay local
The keys are decrypted from the sibling's vault and re-encrypted into PounceTERM's, all on your Mac — they never leave the machine and never travel over the network. You approve one keychain prompt to unlock the exchange.
importaiproviderpouncesqlpouncepadkeysharefamilysibling
MCP server & security
PounceTERM runs a combined local server on 127.0.0.1:7460 — both the MCP tools (so Claude can drive the app) and the terminal WebSocket data plane.
Protections
- Host and Origin are allow-listed (blocks browser DNS-rebinding / CSRF).
- The terminal WebSocket always requires a per-launch token — nothing but this app's window can attach to your terminals.
- You can additionally require a bearer token on the MCP endpoints (Settings → MCP Server).
Running commands still requires per-session AI control regardless of MCP access — see the AI control article.
mcpsecuritytokenportauth
Finding your way around Settings
Settings is one full-screen page with section tabs down the side — pick a section on the left, its controls fill the page, and there's a clear way out on every screen.
The sections
Themes, Fonts, Hosts, Keychain, AI Provider, MCP Server, Logs, Preferences, and more. Two of these were renamed to match PounceTERM's siblings: "AI" is now "AI Provider" (your direct-API providers and keys) and "Claude" is now "MCP Server" (the local server and chat permissions). The same thing is called the same thing across PounceTERM, PounceSQL, and PouncePad.
Themes as preview cards
The Themes section shows each theme as a preview card — you see the actual colors before you pick, rather than choosing a name blind. Font, sizes, and the tab-group style have live examples too.
Preferences
Preferences holds the toggles: Notifications, copy-on-select, the quit prompt, and the Tab groups style. (The optional MCP bearer token lives under MCP Server.)
settingspreferencessectiontabslayoutthemecardai providermcp serverorganize
Themes, fonts, and the side rail
Themes & fonts
Settings → Preferences, or the side rail's Themes tab. The font picker lists every monospace font installed on your Mac and drives both the terminal and the app chrome. Sizes step by 2. Changes apply instantly.
Side rail (⌘.)
- Pounces — saved quick commands; click to type one into the focused terminal (you press Enter).
- History — commands you've typed, searchable.
- Themes — theme cards + font controls.
themefontsizeappearancehomebrewrailpounceshistory
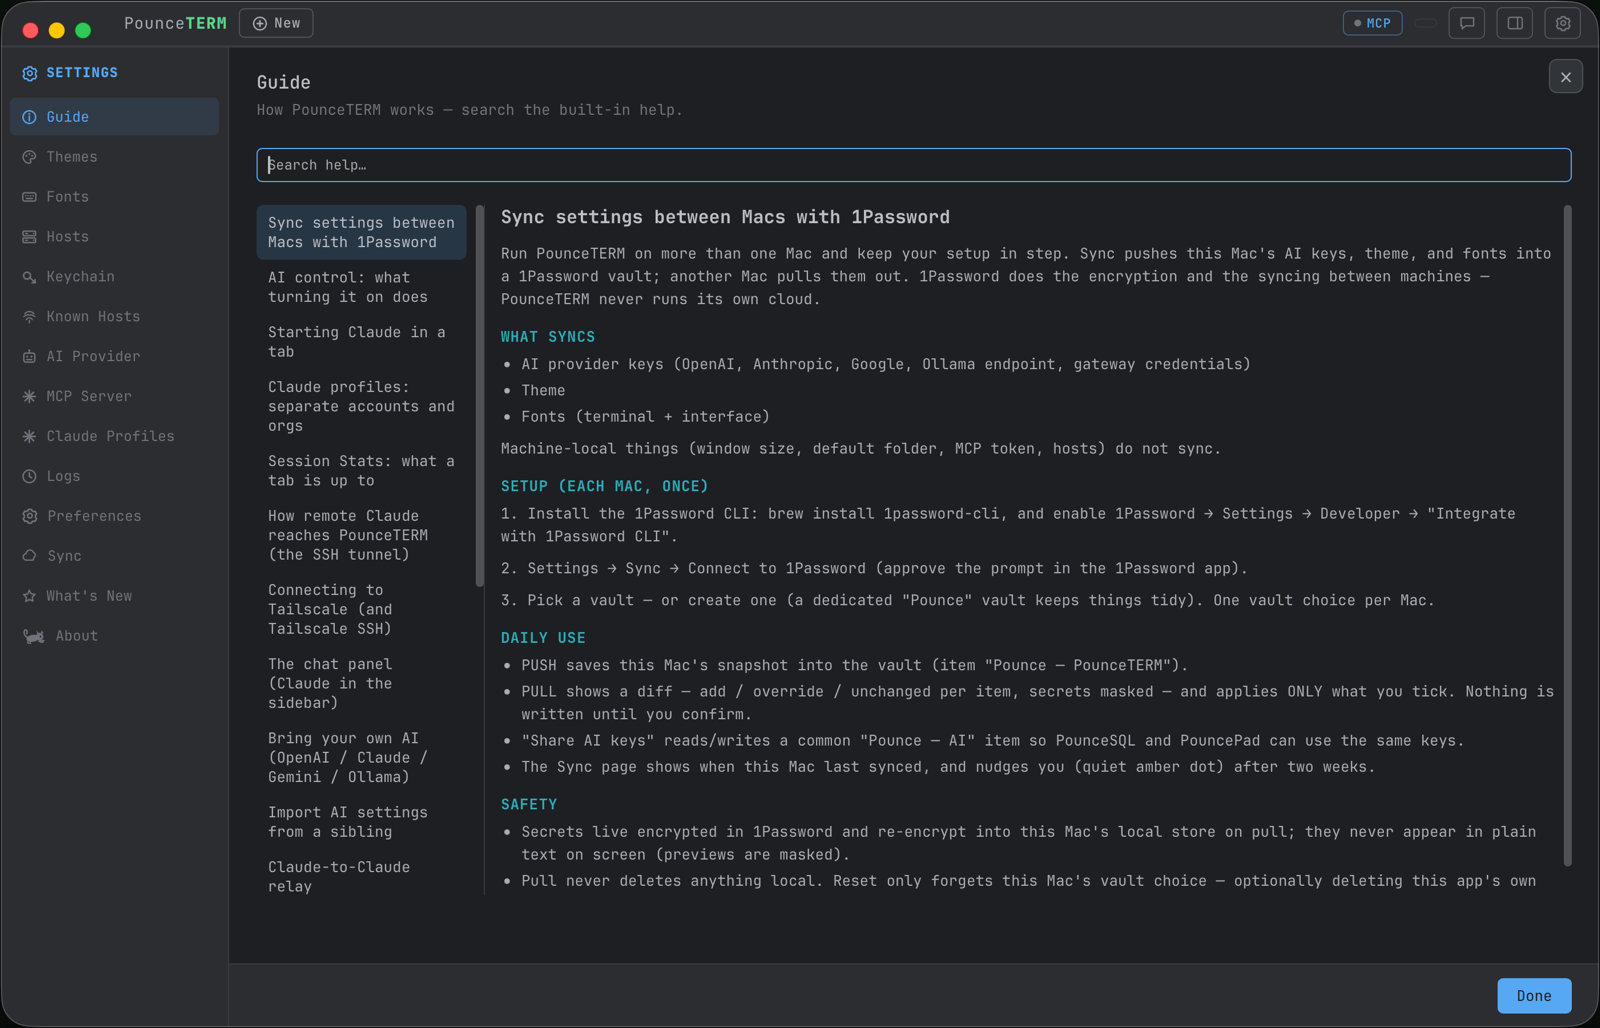
Sync settings between Macs with 1Password
Run PounceTERM on more than one Mac and keep your setup in step. Sync pushes this Mac's AI keys, theme, and fonts into a 1Password vault; another Mac pulls them out. 1Password does the encryption and the syncing between machines — PounceTERM never runs its own cloud.
What syncs
- AI provider keys (OpenAI, Anthropic, Google, Ollama endpoint, gateway credentials)
- Theme
- Fonts (terminal + interface)
Machine-local things (window size, default folder, MCP token, hosts) do not sync.
Setup (each Mac, once)
1. Install the 1Password CLI: brew install 1password-cli, and enable 1Password → Settings → Developer → "Integrate with 1Password CLI".
2. Settings → Sync → Connect to 1Password (approve the prompt in the 1Password app).
3. Pick a vault — or create one (a dedicated "Pounce" vault keeps things tidy). One vault choice per Mac.
Daily use
- PUSH saves this Mac's snapshot into the vault (item "Pounce — PounceTERM").
- PULL shows a diff — add / override / unchanged per item, secrets masked — and applies ONLY what you tick. Nothing is written until you confirm.
- "Share AI keys" reads/writes a common "Pounce — AI" item so PounceSQL and PouncePad can use the same keys.
- The Sync page shows when this Mac last synced, and nudges you (quiet amber dot) after two weeks.
Safety
- Secrets live encrypted in 1Password and re-encrypt into this Mac's local store on pull; they never appear in plain text on screen (previews are masked).
- Pull never deletes anything local. Reset only forgets this Mac's vault choice — optionally deleting this app's own item, never the vault.
sync1passwordvaultkeysthemefontspushpull
Tab groups
Tab groups are optional — the feature stays invisible until you use it. They keep a lot of terminals manageable by grouping them under a color.
Make a group
Right-click a tab and pick a color; that tab joins the group. Grouping never switches your view, so you can drop several terminals into a group and keep working, then open it when you're ready. Moving a terminal between groups is the same — pick a different color.
Open, collapse, and "Other"
Only one group is open at a time (accordion). Collapsed groups sit as color dots on the far left; the open group's terminals sit on the right, next to +. Everything you haven't grouped gathers in the slate "Other" bucket — so every terminal is always in exactly one group, and it's clear which are grouped and which aren't. Click a dot to open that group (the previous one collapses).
Waiting / output
A collapsed group's terminals are hidden, so its dot shows a small activity pip when one of them has output waiting or a Claude reply came back — you won't miss it.
Name a group
Right-click a group's dot → Name group. The name shows on the dot. Right-click again to rename, clear the name, ungroup all, or close all.
Broadcast to a group
Right-click a group's dot (2+ terminals) → Broadcast input to group. After you confirm, whatever you type in any terminal of that group is mirrored to all of them — handy for running the same command across several hosts. An amber banner stays across the top the whole time so it's never a surprise, the group is outlined in amber, and Stop (banner or menu) ends it. Broadcast auto-stops if the group drops below two terminals. Only one group broadcasts at a time.
Limits & style
A colored group holds up to 5 terminals; the Other bucket is unlimited. Groups are session-only (not saved between launches). Pick the group look — underline, fill, left bar, or dot-only — in Settings → Preferences → Tab groups, with a live preview.
groupgroupstabcolororganizeaccordionothername
Deleting history, and private terminals
Two ways to keep something out of your history: remove it after the fact, or never record it.
Delete one command
Open the side rail's History tab and hover any entry — a copy button and a trash button appear. Trash opens a dialog that says exactly what will go: how many copies live in PounceTERM's history, how many are in your shell's history file, and a tick-box to remove those too.
- It deletes EVERY copy of that exact command, not just the one you clicked — leaving three older duplicates behind would defeat the point.
- It understands zsh's timestamped format and multi-line entries, so nothing is left behind as a fragment.
- The file is rewritten atomically and keeps its 0600 permissions.
- There is deliberately NO backup file. A ~/.zsh_history.bak holding the secret you just deleted would quietly undo the whole exercise.
If terminals are still open, the dialog says so: a shell that started before the scrub can write the line back when it exits, because it keeps its own copy in memory. Close those tabs first when it matters.
Private terminals
Right-click a tab → "Private terminal". From then on that tab is not recorded: nothing enters PounceTERM's history (including commands Claude runs there), and the shell is told "unset HISTFILE" so it writes nothing to ~/.zsh_history on exit. That command is typed in the open, never hidden.
Past history still works — it was already loaded, so ↑ recalls everything as usual, and the rail still pastes old commands. The tab shows a private marker and the status bar reads "private — not recorded".
Turning it back off resumes PounceTERM's recording; the shell's own history stays off for the rest of that tab's life, because restoring it would mean guessing at your original HISTFILE. A new tab starts normal.
historydeleteprivatesecretzsh_historyincognitotrash
Keyboard shortcuts
Tabs
- ⌘N — New local terminal
- ⌘W — Close tab
- ⌘K — Quick connect — jump to a host or tab
Terminal
- ⌘F — Find in the scrollback (⏎ / ⇧⏎ next / previous, esc closes)
- ⌘+ / ⌘− — Bigger / smaller font (⌘0 resets)
- ⌘-click — Open a URL in your browser
- select — Copy-on-select — copies the selection automatically
- right-click — Copy the selection, or paste when there is none
View
- ⌘, — Open Settings
- ⌘. — Toggle the side panel
- ⇧⌘J — Toggle the Claude chat panel
Groups & tiles
- right-click tab — Rename, group by color, Start Claude, AI control, Open SFTP here, close
- right-click dot — Tile, broadcast, name, ungroup, close all
- Group tab — Rail tab (when in a group) — tile layout picker, broadcast, members
- click pane — Focus a tile (input goes there)
- zoom button — Maximize a tile / restore (top-right of the pane)
SFTP
- Double-click a folder to enter; drag between panes to transfer
keyboardshortcutkeyshotkeyfontsizezoom